How to Create VLANs on OPNsense: A Step-by-Step Guide
Virtual LANs (VLANs) are essential for segmenting networks, improving security, and optimizing performance. OPNsense, a powerful open-source firewall and routing platform, provides an intuitive way to configure VLANs. In this guide, we’ll walk you through the process of setting up VLANs on OPNsense.
Prerequisites
Before configuring VLANs, ensure you have:
OPNsense installed and running.
A managed switch that supports VLANs.
Basic understanding of networking and VLAN concepts.
Step 1: Access OPNsense Web Interface
Log in to your OPNsense web interface by navigating to https://your-opnsense-ip/.
Enter your administrator credentials.

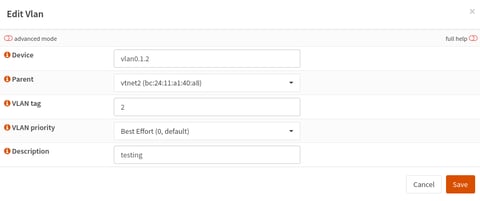
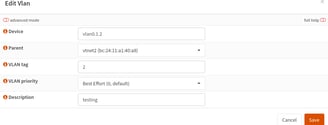
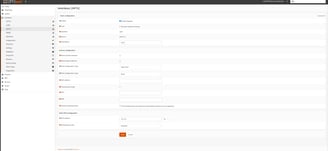
Step 2: Create VLAN Interfaces
Go to Interfaces > Other Types > VLAN.
Click Add.
Configure the following settings:
Parent Interface: Select the physical interface to associate the VLAN with (e.g., vtnet2).
VLAN Tag: Assign a VLAN ID (e.g., 2).
Description: Name the VLAN (e.g., VLAN2 for clarity).
Click Save and Apply Changes.
10.0.0.1 for me
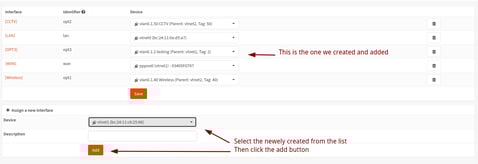
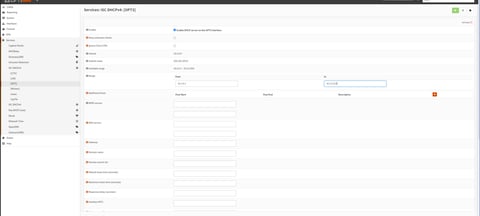
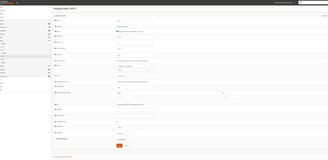
Step 3: Assign VLAN Interfaces
Navigate to Interfaces > Assignments.
Locate the newly created VLAN and assign it to an available interface.
Enable the interface and configure the following:
Static IPv4: Assign an IP address (e.g., 10.2.0.1).
DHCP: Enable DHCP if needed and define the address range.
Click Save and Apply Changes.


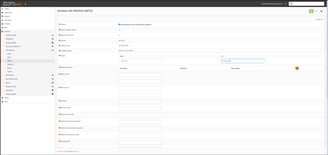
Step 4: Configure Firewall Rules
Go to Firewall > Rules.
Select your VLAN interface (e.g., VLAN10).
Click Add to create a rule:
Action: Pass
Protocol: Any (or restrict based on your needs)
Source: VLAN subnet (e.g., 10.2.0.1/24)
Destination: Any (or specify allowed destinations)
Click Save and Apply Changes.
Step 5: Configure Switch for VLANs
Access your managed switch’s configuration interface.
Assign the correct VLAN IDs to the respective ports:
Tagged: Ports connected to OPNsense.
Untagged: Ports assigned to VLAN-specific devices.
Save and apply changes.
VLAN ASSIGNMENT
ENABLE THE VLAN INTERFACE
dhcp settings

Firewall rules
Step 6: Configure VLANs on a Switch
In my case I am using a Cisco 2950 catalyst switch.
Step 6.1: Access the Switch
Connect to the switch via Telnet or console cable.
Log in using your credentials.
Step 6.2: Create VLANs
1.Enter privileged EXEC mode:
2.Create a VLAN and assign a name:
3.Repeat for additional VLANs if needed.
Step 6.3: Assign VLANs to Switch Ports
1.Enter interface configuration mode for the desired port:
2.For trunk ports (connecting to OPNsense or other switches):
3.Specifically for this switch you can't add a single VLAN for the trunk port.You have to add VLAN 1,1002-1005.
Step 6.4: Save Configuration
Save your settings to avoid losing them after a reboot:
Step 7: Verify VLAN Functionality
Connect a device to a VLAN-enabled port.
Check if the device receives an IP from the correct subnet.
Test connectivity between VLANs if required.
Conclusion – Recap and Next Steps
And there you have it—a fully segmented network using VLANs on OPNsense.
By now, you’ve:
Created VLANs.
Assigned interfaces.
Set up DHCP.
Configured firewall rules.
Tested and fixed any issues.
This setup is perfect for self-hosters, Linux server admins, and home lab enthusiasts.
It keeps your network secure, organised, and efficient.
Ready to take it further?
Experiment with more VLANs, add a managed switch, or dive into advanced firewall rules.


In my case I have two vlan's 40 and 50.Using port 1 for trunk,Port 2 & 4 for access
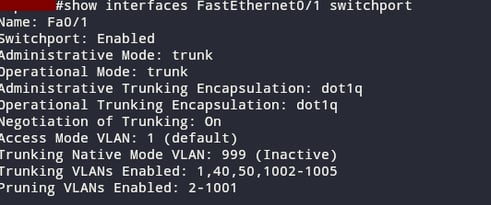
PORT 1 TRUNK PORT
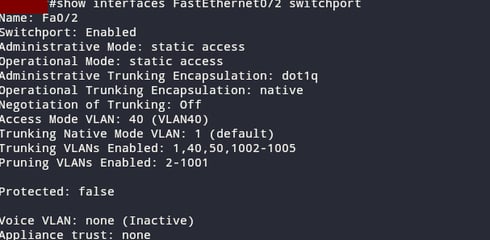
PORT 2 ACCESS VLAN 40
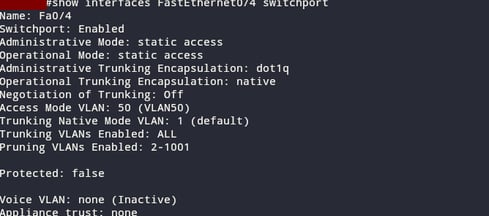
PORT 4 ACCESS VLAN 50
FAQs
Q: Do I need a managed switch for VLANs?
A: Yes, if you want to extend VLANs beyond your OPNsense box. A managed switch lets you tag VLANs across multiple devices.
Q: Can I use VLANs for IoT devices?
A: Absolutely! VLANs are perfect for isolating IoT devices, keeping them away from your main network.
Q: What’s the difference between a VLAN and a subnet?
A: VLANs are about separating traffic at the switch level, while subnets are about IP addressing. They often work together.
Q: How many VLANs can I create?
A: OPNsense supports up to 4095 VLANs, but you’ll rarely need that many.
Final Thoughts
Setting up VLANs on OPNsense doesn’t have to be complicated.
With this guide, you’ve got everything you need to get started.
Whether you’re a self-hoster, Linux enthusiast, or home labber, VLANs are a must-have for better network management.
So, what are you waiting for?
Dive in, experiment, and take control of your network today.
Keyword: Self-hosting, Self-hosted, Linux, Servers